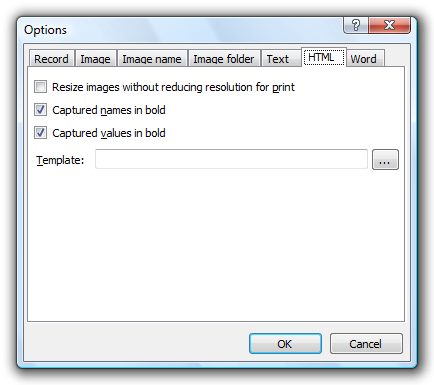
To display the following dialog below, do one of the following:
- click Option in File menu or Option button on toolbar to display Option dialog, and then switch tab.
- In Save/Copy dialog, select HTML and click Details button.
Creating Custom HTML Templates
You can also create your own HTML template files.
- Create an HTML file you want to export by using any HTML editor you use.
- Use the following replacement strings to where appropriate.
- Switch to HTML source view in your HTML editor.
- Now you need to identify tags you want to repeat for every step. This is called the item template.
- Enclose the item template with <!--ClickRec:ItemStart--> and <!--ClickRec:ItemEnd-->.
Click! Recorder replaces following strings in the template.
- {1}
- The item index number.
- {html}
- The captured text in HTML format.
- {text}
- The captured text in plain text format.
- {imgsrc}
- The URL of the image file.
- {imgwidth}
- The width of the image file.
- {imgheight}
- The height of the image file.
![]() The
templates are not compatible with Click! Recorder version 1.
The
templates are not compatible with Click! Recorder version 1.
![]() You could
create a separate item template for items without screen captures. To do so, enclose them with the same tag used for an item template. When there
are two item templates in a single template file, Click! Recorder uses the first
item template for items with screen captures, and the second for items without.
You could
create a separate item template for items without screen captures. To do so, enclose them with the same tag used for an item template. When there
are two item templates in a single template file, Click! Recorder uses the first
item template for items with screen captures, and the second for items without.
![]() All default
templates use UTF-8. If you want to use a different encoding, change the charset= attributes in the template files. Click! Recorder
will detect the
encoding specified in the template file.
All default
templates use UTF-8. If you want to use a different encoding, change the charset= attributes in the template files. Click! Recorder
will detect the
encoding specified in the template file.
The "normal" HTML template looks like the below.
<!DOCTYPE html PUBLIC
	"-//W3C//DTD XHTML 1.0 Transitional//EN"
	"http://www.w3.org/TR/xhtml1/DTD/xhtml1-transitional.dtd"
	>
<html xmlns="http://www.w3.org/1999/xhtml">
<head>
<title></title>
<meta http-equiv="Content-Type"
	content="text/html; charset=utf-8"/>
</head>
<body>
<ol>
<!--ClickRec:ItemStart-->
<li>{html}<br/>
<img src="{imgsrc}"
	width="{imgwidth}"
	height="{imgheight}"
	alt="{text}"/>
</li>
<!--ClickRec:ItemEnd-->
<!--ClickRec:ItemStart-->
<li>{html}</li>
<!--ClickRec:ItemEnd-->
</ol></body></html>