This page is for version 1.x of Click!
Recorder.
Click here for Click! Recorder version 2.
Click here for Click! Recorder version 2.
Getting started with Click! Recorder
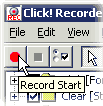
You can capture screen shots or make step-by-step help by following steps with Click! Recorder.
- Record your operations.
- Stop recording.
- Choose recorded step or image for your own needs.
- Save texts or screen shots.
- Finalize editing by using Word Processor or Editor which you usually use.
 If you use Microsoft Word,
please refer to here.
If you use Microsoft Word,
please refer to here.
 Start Recording
- Start the application you want to record.
- Click Start and point to Program, and then Click Click! Recorder.
- Do one of the following:
- Press the PAUSE key.
- Click Record Start button on the toolbar.
- On the File menu, click Record Start.
Stop Recording
Do one of the following:
- Press the PAUSE key.
- Activate Click! Recorder by clicking Windows task bar or pressing ALT+TAB.
- Click Record Stop button on the toolbar.
- On the File menu, click Record Stop.
Screen Captures By Keyboard
| PrtScn | Capture full screen |
| Alt + PrtScn | Capture active window |
![]() These keyboard
operations works even when you are not recording.
These keyboard
operations works even when you are not recording.